Getting started
Installing ethoscopy as a docker container with ethoscope-lab (recommended).
The ethoscope-lab docker container is the recommended way to use ethoscopy. A docker container is a pre-made image that will run inside any computer, independent of the operating system you use. The docker container is isolated from the rest of the machine and will not interfere with your other Python or R installations. It comes with its own dependencies and will just work. The docker comes with its own multi-user jupyter hub notebook so lab members can login into it directly from their browser and run all the analyses remotely from any computer, at home or at work. In the Gilestro laboratory we use a common workstation with the following hardware configuration.
CPU: 12x Intel(R) Xeon(R) CPU E5-1650 v3 @ 3.50GHz
GPU: Intel(R) Xeon(R) CPU E5-1650 v3 @ 3.50GHz
Hard drive: 1TB SSD for OS, 1TB SSD for homes and cache, 7.3 TB for ethoscope data
Memory: 64GB
The workstation is accessible via the internet (behind VPN) so that any lab member can login into the service and run their analyses remotely. All the computational power is in the workstation itself so one can analyse ethoscope data from a tablet, if needs be. Follow the instruction below to install the ethoscope-lab docker container on your machine.
On linux (recommended)
The best solution is to install this on the same computer that collects the ethoscope data so ethoscopy can have access to the db files directly stored in the machine. For most small installations, this computer could be the node.
To install the docker you will have to find out the following information:
- what is the internet name or address of the computer you want to access? This can be the IP or an actual name.
- Where are your ethoscope data stored? On a regular node they would be in
/ethoscope_data/results
Once these info are clear, you can proceed.
# Optional. Update the system to the latest version. You may want to restart after this.
sudo pamac update
# install docker
sudo pacman -S docker
# start the docker service
sudo systemctl enable --now docker

# and finally download and run the ethoscope-lab docker container
# the :ro flag means you are mounting that destination in read-only
sudo docker run -d -p 8000:8000 \
      --name ethoscope-lab \
      --volume /ethoscope_data/results:/mnt/ethoscope_results:ro \
      --restart=unless-stopped \
      ggilestro/ethoscope-lab
Installation on Windows or MacOS makes sense if you have actual ethoscope data on those machines, which is normally not the case. If you go for those OSs, I won't provide detailed instruction or support as I assume you know what you're doing.
On MacOS
Install the docker software from here. Open the terminal and run the same command as above, e.g.:
# download and run the ethoscope-lab docker container
# the :ro flag means you are mounting that destination in read-only
sudo docker run -d -p 8000:8000 \
      --name ethoscope-lab \
      --volume /path/to/ethoscope_data/:/mnt/ethoscope_results:ro \
      --restart=unless-stopped \
      ggilestro/ethoscope-lab
On Windows
Install the docker software from here. After installation, open the window terminal and issue the same command as above, only replacing the folder syntax as appropriate. For instance, if your ethoscope data are on z:\ethoscope_data and the user data are on c:\Users\folder use the following:
sudo docker run -d -p 8080:8080 \
      --name ethoscope-lab \
      --volume /z/ethoscope_data:/mnt/ethoscope_results:ro \
      --restart=unless-stopped \
      ggilestro/ethoscope-lab
Storing user data on the machine, not on the container (recommended)
ethoscopelab runs on top of a jupyterhub environment, meaning that it supports organised and simultaneous access by multiple users. Users will need to have their own credentials and their own home folder. The default user is ethoscopelab, with password ethoscopelab and this user will save all of their work in the folder called /home/ethoscopelab. In the examples above, the users' folders are stored inside the container itself which is not ideal. A better solution is to mount the home folders to a local point in your machine. In the example below, we would use the folder /mnt/my_user_homes.
sudo docker run -d -p 8000:8000 \
      --name ethoscope-lab \
      --volume /ethoscope_data/results:/mnt/ethoscope_results:ro \
      --volume /home:/mnt/my_user_homes \
      --restart=unless-stopped \
      ggilestro/ethoscope-lab
Make sure that your local home location contains an
ethoscopelabfolder that can be accessed by theethoscopelabuser! In the example below, you would need to create a folder called/mnt/my_user_homes/ethoscopelab.
Any folder in /mnt/my_user_homes will become accessible to ethoscopelab. In our lab, we sync those using owncloud (an opensource Dropbox clone) so that every user has their files automatically synced across all their machines.
Creating new users
If you wan to add new users, you will have to do it from the command line. On the linux computer running ethoscopelab (normally the node) use the following commands:
#enter in a bash shell of the container
sudo docker exec -it ethoscope-lab /bin/bash

#create the username
useradd myusername -m

#set the password for the  username you just created
passwd myusername
You will now be able to login into jupyter with these new credentials. The data will be stored in the newly created folder.
Persistent user credentials
In linux, user credentials are saved inside three files: /etc/passwd, /etc/shadow, /etc/group. It is possible to store those on the host computer (e.g. the node) and then mount them to the container. This is called a persistent volume because the data will remain on the host computer even if the container is deleted. An example of a container running in this way is the following:
sudo docker run -d -p 8000:8000 \
      --name ethoscope-lab \
      --volume /mnt/data/results:/mnt/ethoscope_results:ro \
      --volume /mnt/data/ethoscope_metadata:/opt/ethoscope_metadata \
      --volume /mnt/homes:/home \
      --volume /mnt/cache:/home/cache \
      --restart=unless-stopped \
      -e VIRTUAL_HOST="jupyter.lab.gilest.ro" \
      -e VIRTUAL_PORT="8000" \
      -e LETSENCRYPT_HOST="jupyter.lab.gilest.ro" \
      -e LETSENCRYPT_EMAIL="giorgio@gilest.ro" \
      --volume /mnt/secrets/passwd:/etc/passwd:ro \
      --volume /mnt/secrets/group:/etc/group:ro \
      --volume /mnt/secrets/shadow:/etc/shadow:ro \
      --cpus=10 \
      ggilestro/ethoscope-lab.gilest.ro:latest
Lines 12-14 indicate the location of the user credentials. This configuration allows to maintain user information even when upgrading ethoscopelab to newer versions.
Troubleshooting
If your Jupyter starts but hangs on the following image
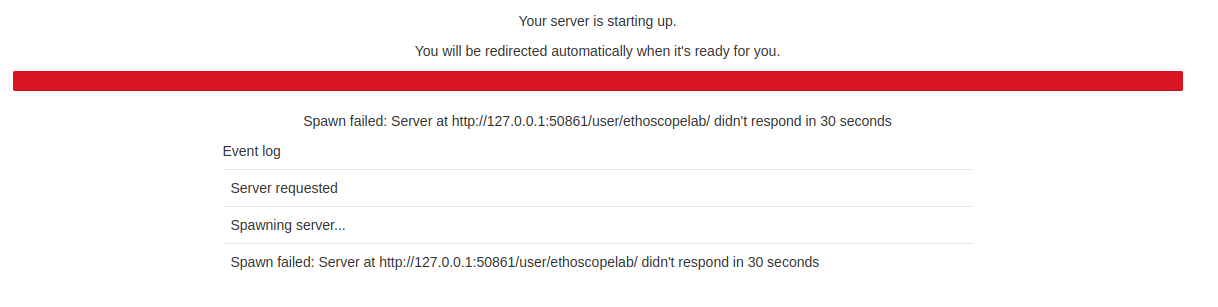
It means that the ethoscopelab user does not have access to its own folder. This most likely indicates that you are running the container mounting the folder onto your local machine but the ethoscope home folder is either not present or does not have reading and writing access.
Install ethoscopy in your Python space
Ethoscopy is on github and on PyPi. You can install the latest stable version with pip3.
pip install ethoscopy
As of version 2.0.5, the required dependencies are:
Python >= 3.10
numpy >= 2.0
pandas >= 2.2.2
plotly >= 5.22
seaborn >= 0.13
hmmlearn >= 0.3.2
pywavelets >= 1.6
astropy >= 6.1
tabulate >= 0.9
colour >= 0.1.5
nbformat >= 5.10
Tutorial data
Starting with ethoscopy 2.0.5, the six tutorial pickle files (~36 MB total, dominated by overview_data.pkl at ~31 MB) are no longer bundled with the PyPI wheel — pip install ethoscopy ships code only. The tutorial notebooks fetch the datasets on demand with a single one-time call:
import ethoscopy as etho
etho.download_tutorial_data()   # idempotent — skips files already on disk
By default this populates ~/.cache/ethoscopy/tutorial_data/, which is user-writable on every platform (no root or sudo needed). After that, get_tutorial('overview'), get_tutorial('circadian') and get_HMM('M'|'F') work as shown in the tutorial notebooks.
Lookup order. At load time, ethoscopy checks three locations in this order:
<site-packages>/ethoscopy/misc/tutorial_data/— dev / editable installs and theethoscope-labDocker image (which pre-populates it at build time, see below).$ETHOSCOPY_TUTORIAL_DATA_DIRif set — useful for shared clusters where one admin-maintained copy serves many users.~/.cache/ethoscopy/tutorial_data/— the default fordownload_tutorial_data().
The canonical URLs live at github.com/gilestrolab/ethoscopy/tree/main/src/ethoscopy/misc/tutorial_data. Place the six *.pkl files in any of the three locations above if you prefer to download manually.
ethoscope-lab users don't need to do anything. The Docker image (
ggilestro/ethoscope-lab:1.2and later) runsdownload_tutorial_data(dest_dir=package_tutorial_data_dir())during build, so the pickles are already present in the image. JupyterHub users can run the tutorials without any download step.
Why this changed
Versions 2.0.0–2.0.4 of the PyPI wheel unintentionally shipped without any tutorial pickles because .gitignore contained a blanket *.pkl rule that Hatchling's default VCS plugin honoured when building the wheel. Users running get_tutorial('overview') got FileNotFoundError with no guidance. Version 2.0.5 makes the omission explicit, ships a stdlib-only download helper with a user-writable default, surfaces an actionable error message when files are missing, and (for the Docker image) pre-populates them during the build so containerised users never see the download step.